Thinning Brows? I Tried Microblading & Shading! Here’s What Happened.

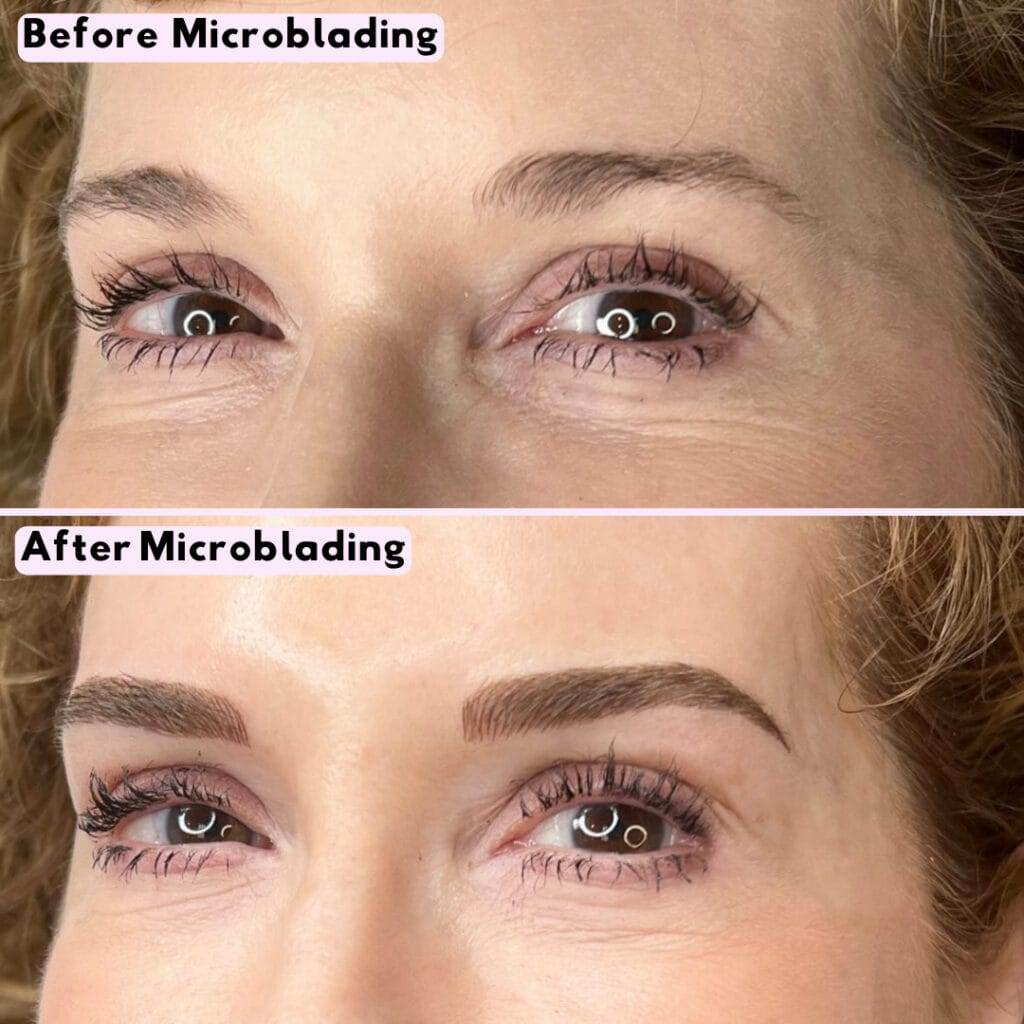
My brows have thinned as I’ve aged! Have yours? I have pretty good natural brows (thanks to using every day), but despite my best efforts, my brows have gotten sparse and patchy over time. I’d been thinking of trying microblading for some time, but I had some misgivings and (apparently!) some misconceptions about it that were holding me back.
If you’re over 50, you’ve probably realized that your brows have thinned as you’ve aged. Don’t blame yourself! Brow thinning is a normal part of aging! Our skin loses its elasticity as we age, causing hair follicles to become brittle and fall out. In fact, some of these hair follicles may stop producing hair altogether, which may cause our eyebrows to thin out and appear patchy. Additionally, over time the tails and the front of our brows recede, exacerbating the issue. For millions of women, microblading has been the answer.
When Rebecca Harris of Brow Revolution in Dallas reached out to me and asked me if I would be interested in trying microblading and shading, I decided I needed to consider it. Rebecca has 3 years of experience as a Microblading Artist in the Dallas area. She was personally mentored at one of the most well-known brow studios in Dallas. She holds a total of ten Permanent Makeup (PMU) certifications and is also a Licensed Esthetician with 6 years experience.
What is Microblading?
Microblading is a personalized, semi-permanent makeup technique that fills in thin eyebrows to make them look fuller. It fills in gaps in your brows and corrects over-plucked brows. Microblading frames the face and restores the natural brow shape you used to have. It blends in with the brow hair that you do have and saves you time penciling and filling in your brows every morning. (I’m all for that! How about you?)
The Midlife Makeup
Mistakes You May Be Making
Plus, How to Fix Them!
Already a subscriber?
Enter your email—you won’t be
subscribed twice!
Common Misconceptions About Microblading
I had multiple concerns and misconceptions about microblading! These concerns held me back from trying it for years! You may have some of the same ones. Rebecca talked through each of them, and the blog and FAQ sections of her website clarified things as well.
- Microblading is tattooing. Tattoos are permanent, but microblading is only semi-permanent. In microblading, the ink is not placed as deep in the skin as in tattooing. Over time, microblading fades significantly compared to a permanent tattoo. Microblading requires regular touchups every one to two years.
- Microblading is one-size-fits-all. I was afraid that I would end up with giant brows that were too large for my face! Instead, expert microblading is all about creating the best eyebrow shape for each face. It’s a completely personalized approach for each client.
- It hurts. You will be numbed 2-3 times during the process and shouldn’t feel any pain.
- The color will be wrong. The pigments that will be used in your microblading will be personally selected to match your natural hair and brow color. They hold their color and will gradually lighten and fade over time.
Microblading & Shading Step-by-Step
1. Numbing
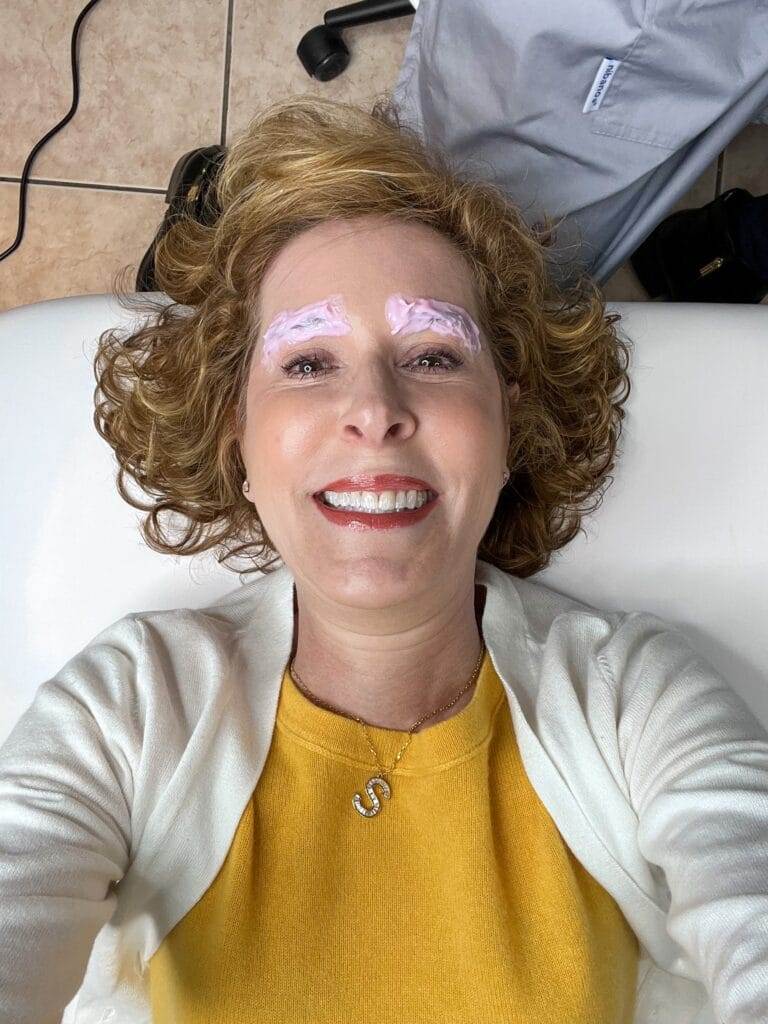
The first step in microblading is numbing. It makes the process relatively painless! During the 30 minutes it took to numb my brows, Rebecca explained everything she would be doing, answered my questions, and shared how she personalizes microblading and shading for each client.
2. Brow Mapping
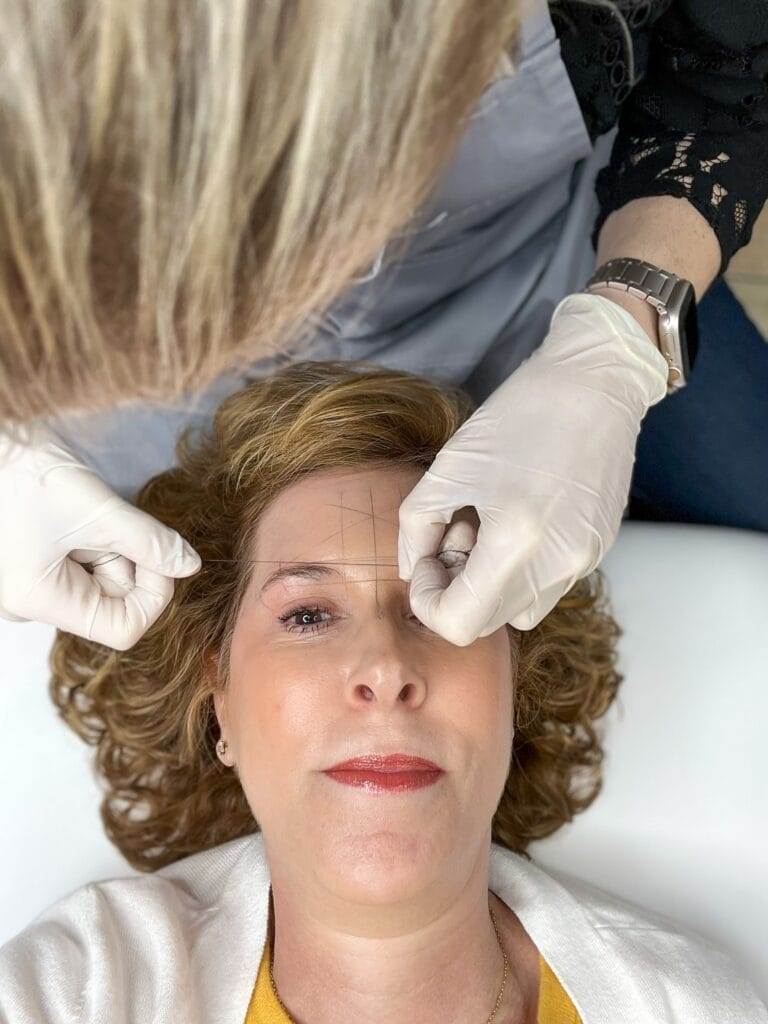
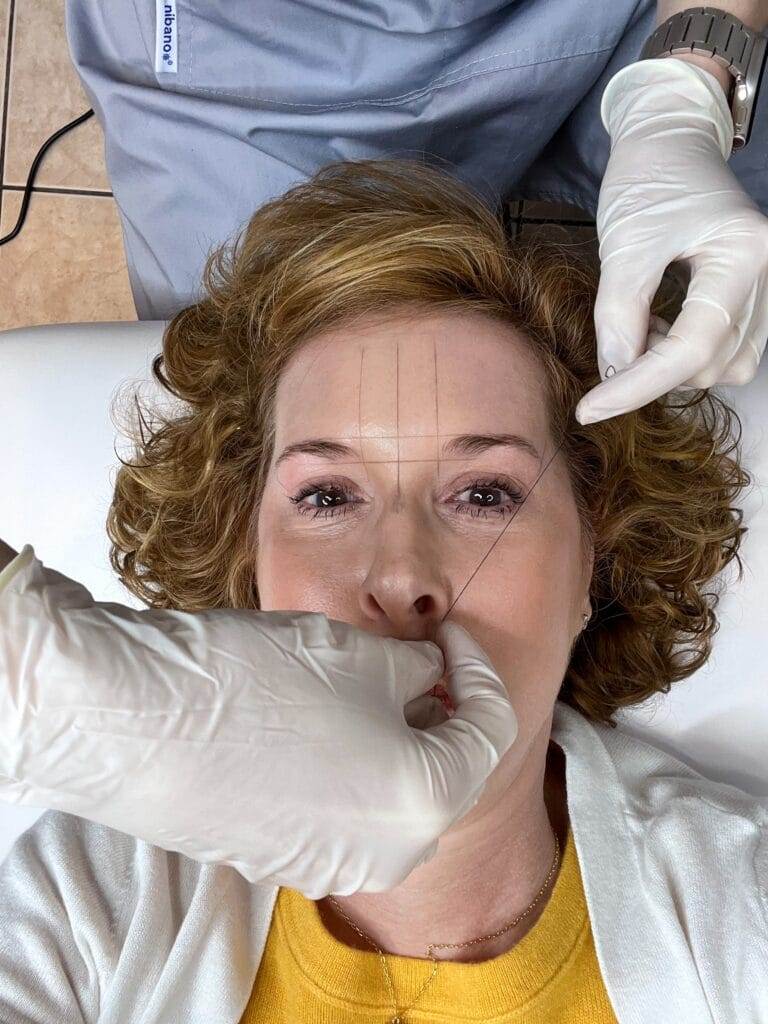
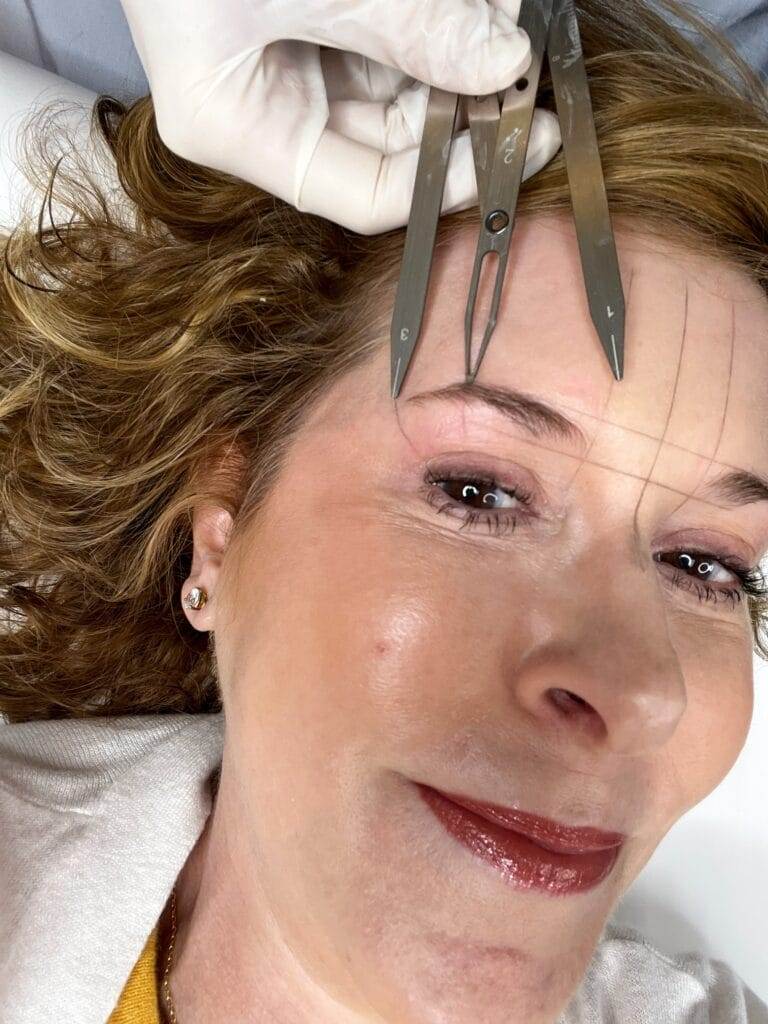
Since microblading is a personalized service, the shape of your brows is customized to your facial structure and how your brow hair grows! Rebecca used a pigmented string (It looked like black dental floss.) and a caliper to map my face and mathematically determine where my brows should start and end, ensure that they would be symmetrical, and figure out exactly where to place the arch.
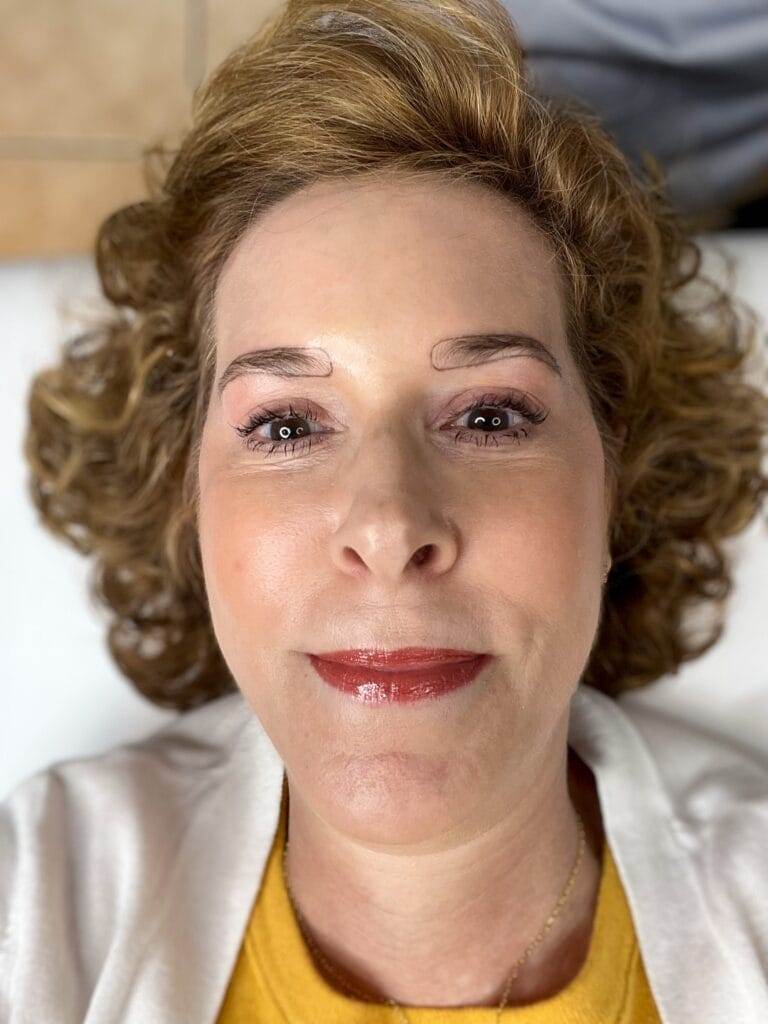
Next, she outlined my brows with a pen, and we discussed the size and shape. She made sure I was completely comfortable with how it looked. I didn’t want the front of my brow to be too squared off, so we opted for rounder, softer corners in that area. I also wanted to be sure the tail of the brow didn’t go too low, pulling down the sides of my face.
3. Microblading
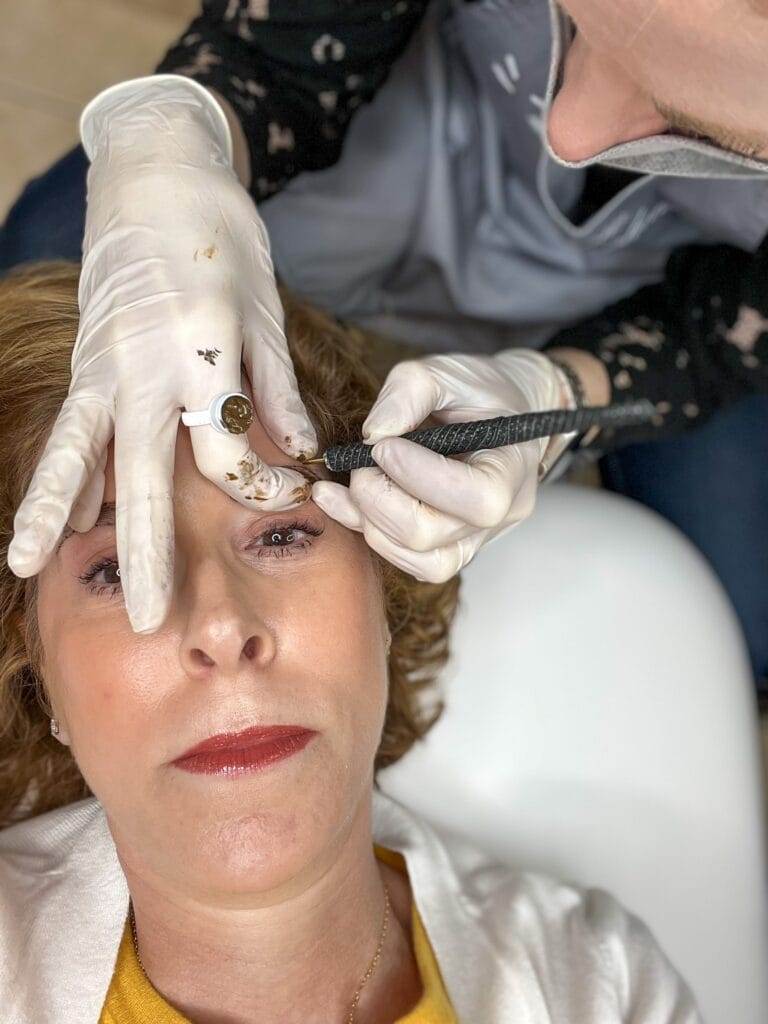
Your microblading artist will use a tool explicitly made for microblading with a thin blade to create hair-like strokes. It deposits pigment in the brow area to enhance the existing brow.
Rebecca used a customized pigment that perfectly matched the brow hair color that I already had. (See it in the photo above on her right index finger.) The sensation felt like someone was making tiny scratches on my brow, but thanks to the numbing, there was no pain.
4. More Numbing
After the first round of microblading, Rebecca numbed me again. The second time around, the numbing sinks in deeper since the microblading tool has already penetrated the skin. After numbing, she repeated the microblading process one more time, going back over the area to fill in between the strokes she made during round one.
5. Tweezing
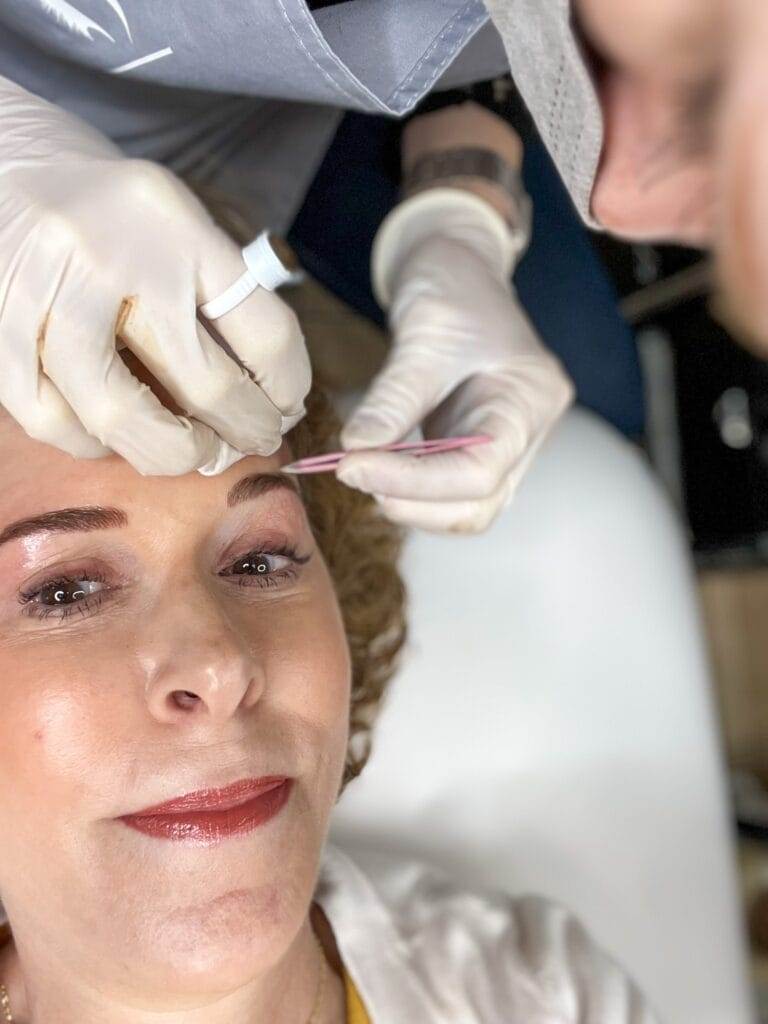
After finishing round two of microblading, Rebecca tweezed the area to refine the shape and remove stray hairs. Then she numbed the area a third time in preparation for shading.
6. Shading
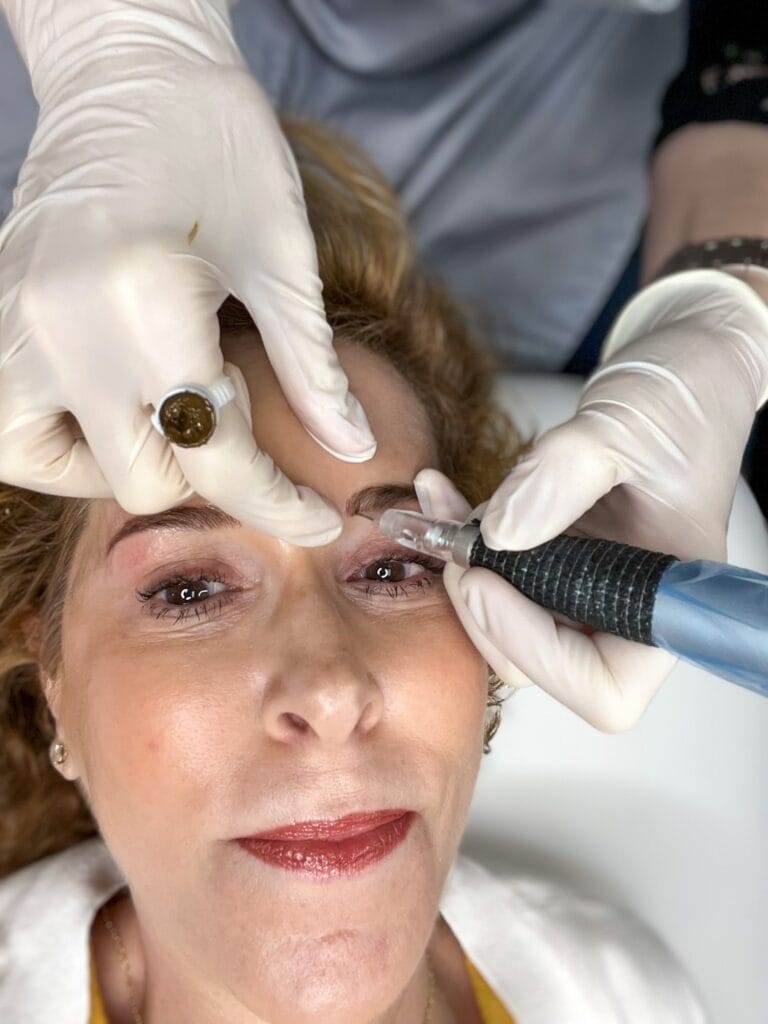
Shading fills in the brow areas that have sparse hair. It brings in more color dimension and density to the brows. Your microblading artist will use a special device to apply pin-dots of pigment, creating a shaded, natural appearance.
7. Ink Bath
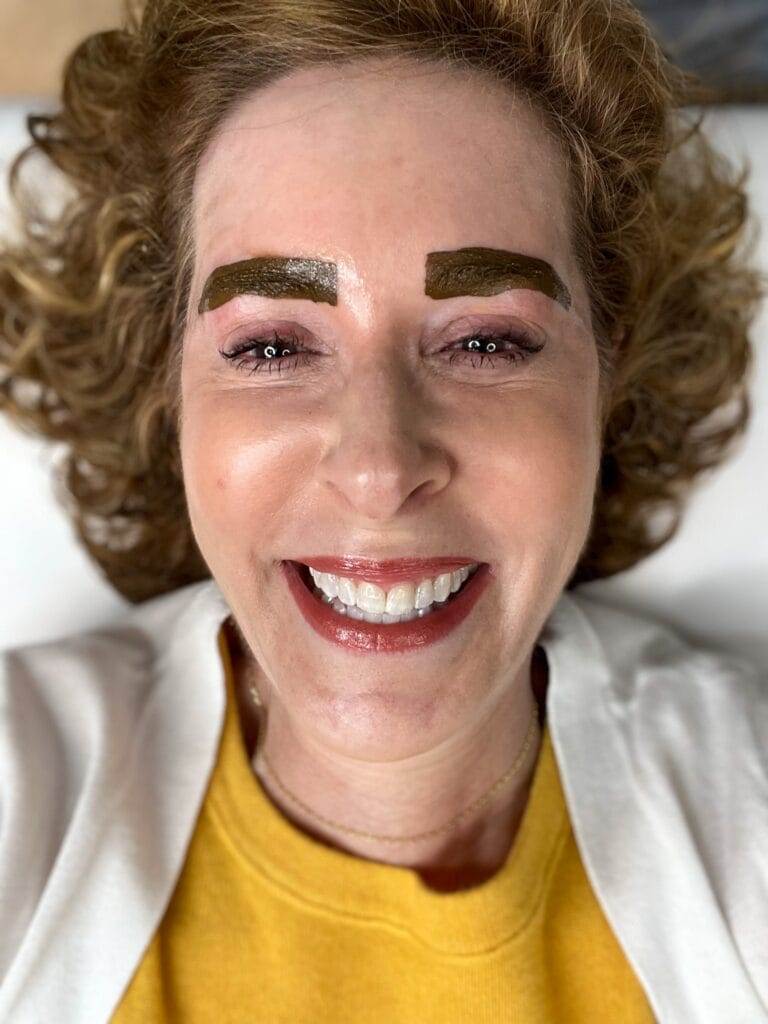
Once microblading and shading are finished, your microblading artist will do an “ink bath.” The ink will sit on your brows for 10 minutes. This solidifies your results, allowing the ink to penetrate into the skin, making your results last longer. (Don’t I look like Groucho Marx? I couldn’t stop laughing!)
8. Aftercare
There is no immediate downtime, but the area around your brows will look slightly red due to inflammation after your procedure. Rebecca provided thorough aftercare instructions. On the first day, she had me gently wash my brows several times with the special soap she provided. Gentle cleansing prevents the buildup of lymphatic fluid that can lead to scabbing.
After the first day, you cannot get your brows wet for seven days. This is standard procedure after microblading. After that, you will use a light coating of A&D Ointment every 2-3 hours on your brows for the next ten days to promote healing and optimize your results.
8. The Phases of Healing
Rebecca shared what I could expect during healing. I found these phases completely reflected my experience.
- Days 1-5: Brows will be much darker than they were initially.
- Days 5-11: Brows may be itchy and usually go through a shedding process
- Weeks 2-3: Brows are completely healed. They look much lighter (almost too light!) and slightly smaller than they did immediately after microblading.
- Weeks 4-6: Some of the color reemerges and whatever doesn’t come back is addressed in the second treatment.
My Results
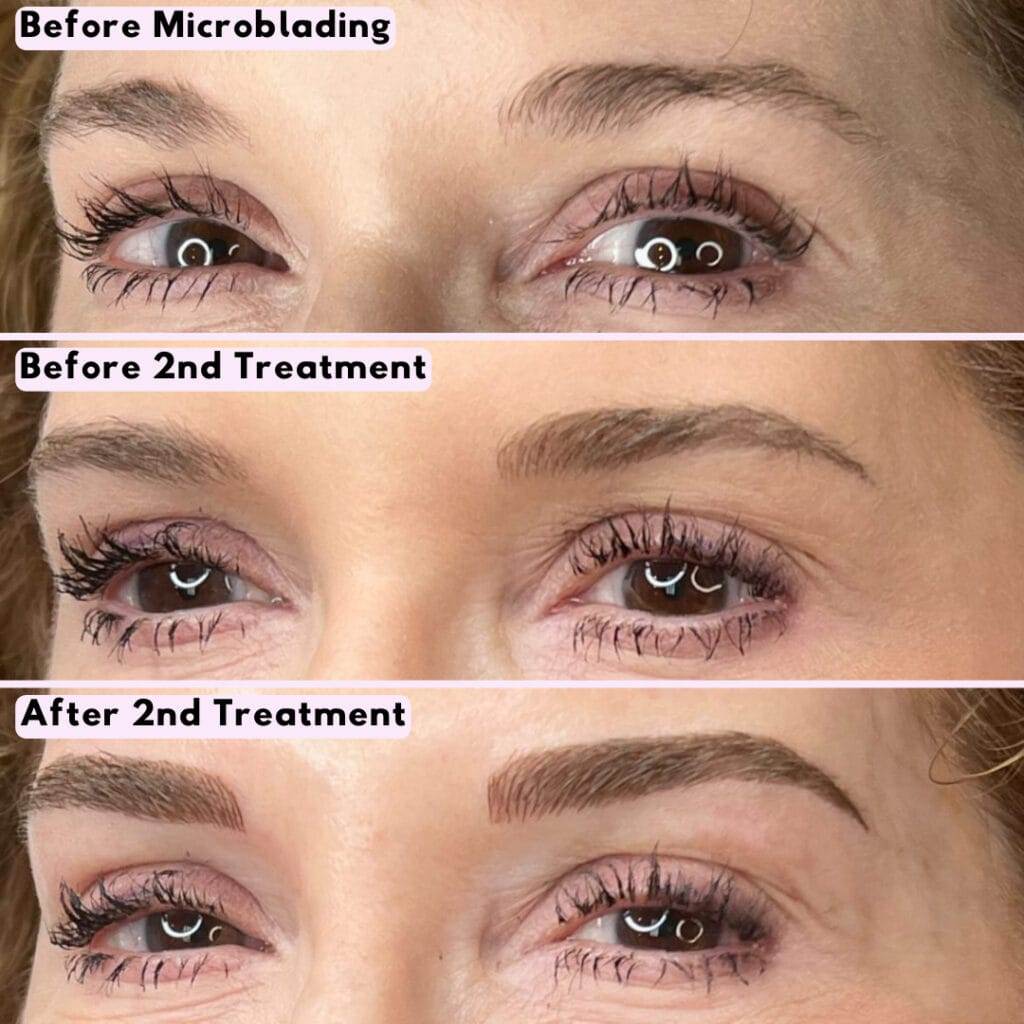
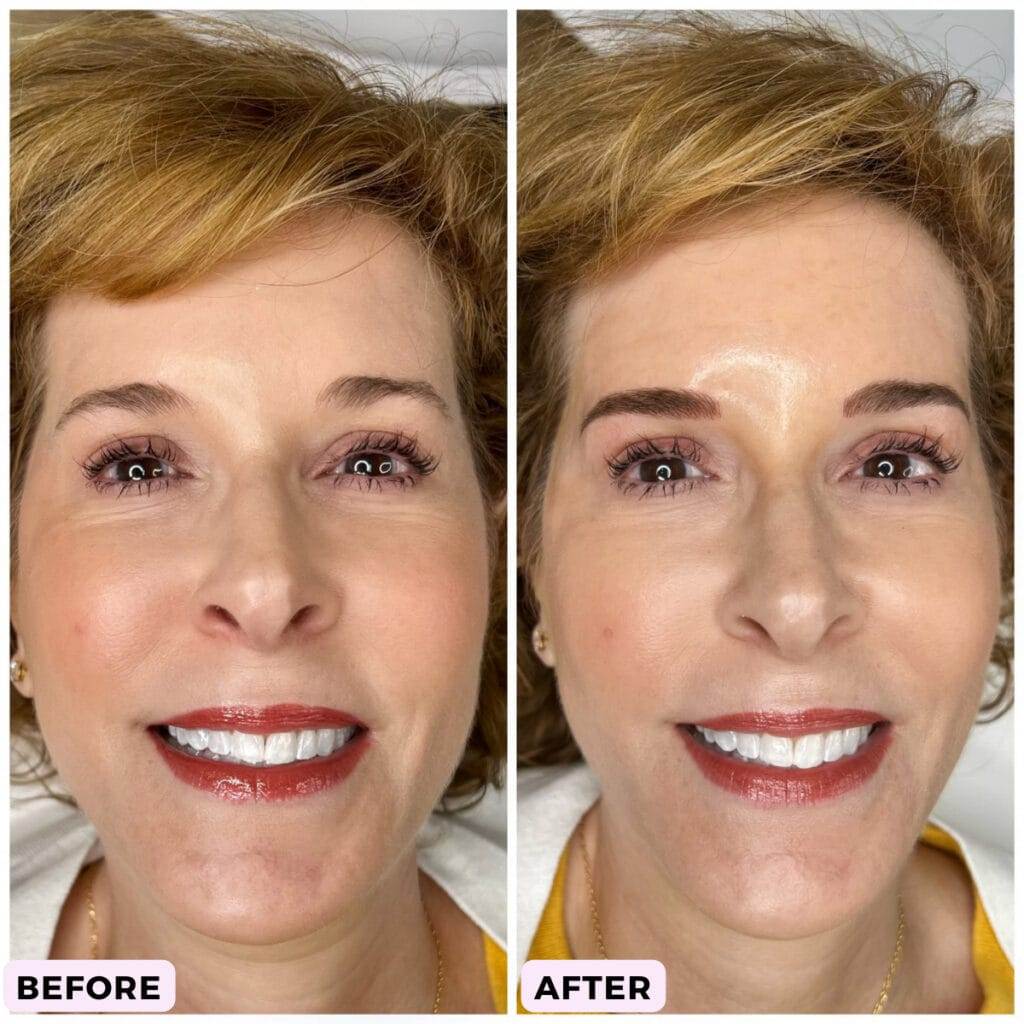
I was thrilled with the results after my first microblading session, and I couldn’t believe it took me so long to try it! The results after session two were even better!
After Microblading & Shading Session 1
After Microblading & Shading Session 2
(Insert Session 2 before and after image HERE)
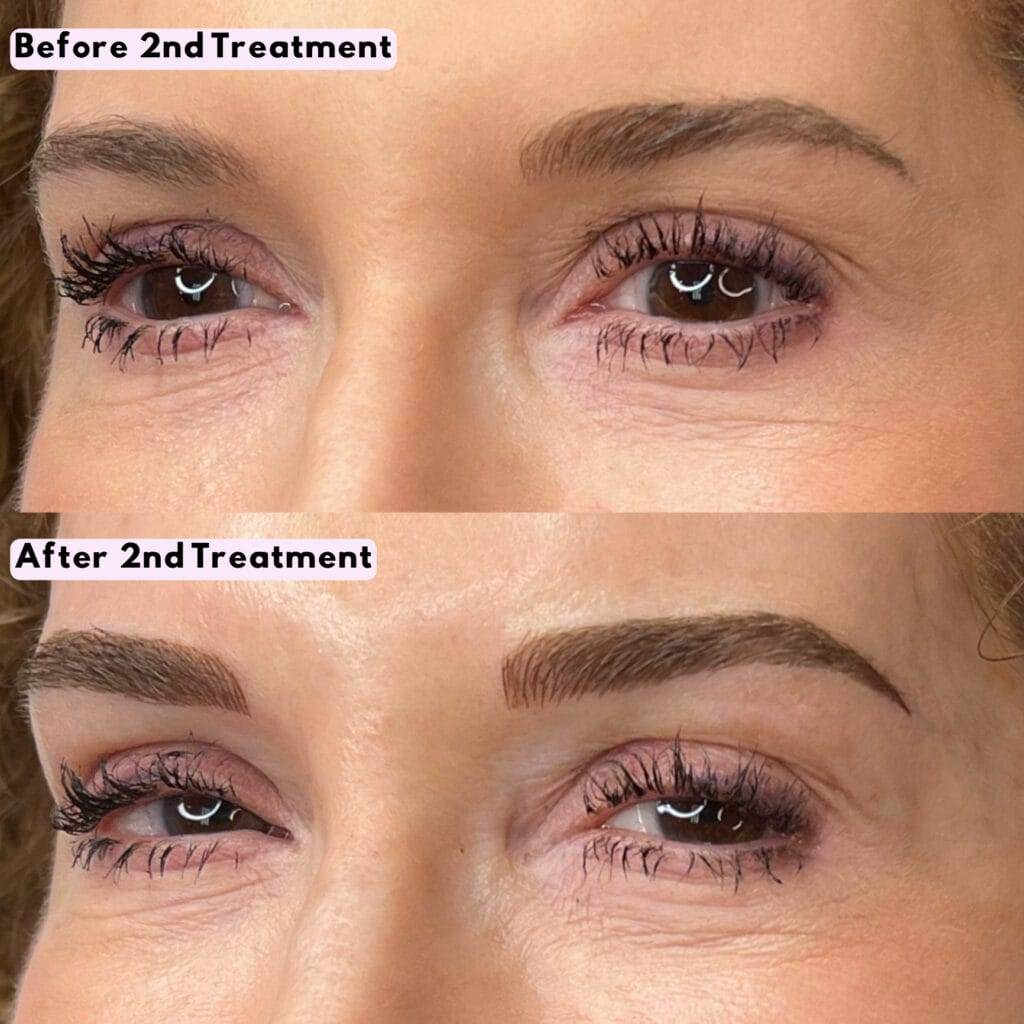
A second microblading treatment is necessary to reinforce the first treatment, fill in any patchiness, and refine your results. It’s designed to make sure that your results are long-lasting. Think of it like applying that second coat of nail polish when you’re doing a DIY mani. You wouldn’t stop after one coat because the manicure wouldn’t last as long and your results wouldn’t be as good.
During the second treatment, Rebecca did exactly the same thing as the first treatment. Just like she did the first time, she numbed me thoroughly, and I didn’t feel any pain at all. In fact, I was so relaxed during my second treatment, I actually fell asleep for part of it!
I am thrilled with my results and how natural my brows look. I can’t believe I waited so long!
The Bottom Line
The first microblading and shading appointment takes three hours. Since no brow mapping is necessary, the second appointment is two hours. You need a second appointment to perfect your results and make them last as long as possible. You will schedule your second appointment 6-8 weeks after your first.
Microblading prices vary, but remember that you are paying for artistry and experience and that the results last 1-2 years. Rebecca charges $380 for the first microblading session, and shading is a $100 add-on fee. The second session is $280. Rebecca runs specials periodically. You can contact her by calling 469-690-7474, emailing her, or filling out the contact form on the BrowRevo website.
To learn more, check out the excellent and informative blog and FAQ sections of Rebecca’s BrowRevolution.com website. To see examples of her work, follow her on Instagram and Facebook.
Rebecca is generously offering a 20% discount on microblading & shading exclusively for Empty Nest Blessed followers! If you live in the Dallas area or are willing to travel to Dallas to have Rebecca do your microblading, mention that you read this post and get ready for beautiful brows!
Have you ever tried microblading and shading? Do you have questions that I didn’t answer? Please leave a comment below and let me know! If you enjoyed this post and you’d like to read more Empty Nest Blessed beauty-related content, click HERE.














Because my brows have always been white, microblading is the best thing ever! However, since it doesn’t color the brow hairs, I still use a few swipes of a pencil, but I don’t have to struggle getting the shape right. (Since I’m very fair, having my brows dyed looks too harsh.) My artist was also able to improve the symmetry of my brows where one was considerably lower than the other. Just be sure to use an artist who comes highly recommended, even if you have to wait a long time for an appointment.
Sue,
What great advice! A good brow artist will customize your brows specifically for your face, and situation! I’m so happy you had a good experience! I did too.
Thanks so much for sharing your experience!
xoxo
Suzy
I have tried micro blading twice, by 3 different artists. Unfortunately, it did not take well on my skin. I liked the look but mine faded after 3 months. My dermatologist said there are some skin types that just don’t handle micro blading well. Glad you had great results. Me, not so much.
Beverly,
Oh, you must’ve been so disappointed! So sorry it didn’t take well for you. That is unusual, I know. Thanks for sharing your story.
xoxo
Suzy
Hi Suzy,
I had microblading at least 5 or more years ago. It turned out beautifully and I love it. However, it was very painful. I really like how you were numbed throughout the procedure. As I said it was long ago, but I don’t remember the numbing throughout. I need to have it done again, but due to pain, I’ve been dragging my feet.
Nancy,
Oh, my word, that is TERRIBLE! I am a pain wimp and could never have done it if I hadn’t been numb! I would do your research and talk in-depth with your brow artist before even booking an appointment.
I had the pink (!) numbing cream on for 30 minutes before we even started, during which time I grilled poor Rebecca on exactly what she was going to be doing, how it was going to feel, how it was going to look, etc. I was trying to be all hard-hitting blogger/journalist, but really I was just nervous about EVERYTHING! She was VERY patient with me. If you don’t feel comfortable, don’t do it!
xoxo
Suzy
I have had it done twice and the last time was very painful. I have been having my brows threaded and tinted ever since. After reading your post I might consider micro blading again!
Pam,
I am SO sad to hear that you had a bad experience! When Rebecca initially reached out to me, that was the very first thing I asked her about! (The second was the size of my finished brows and if they would look right on my face!)
She numbed me three times which was perfect. If you find a brow artist you like, I hope you are able to get their assurance on pain management!
Thanks so much for your comment!
xoxo
Suzy